7. Putting it all together in a composition
7.1. Designing a composition
7.1.1. Starting new
When you create a composition, there is usually a problem you want to solve. Let’s use an example to demonstrate this approach. How would I create a composite image made up of two images blended together?
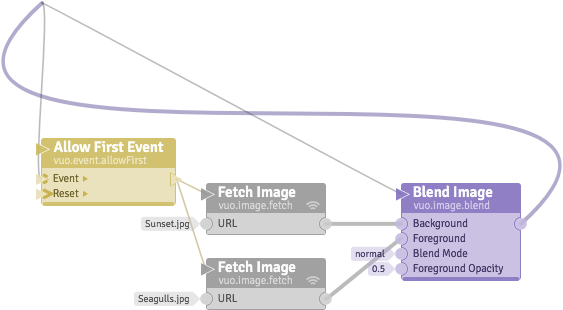
First, you know you’ll need the two images, so drag the two files onto the canvas. Vuo will create two Fetch Image nodes, with the image locations filled in.
Search the Node Library for “composite image,” and drag Blend Images onto canvas. Alternately, you could search the Node Library for “image” and see a list of all the nodes that manipulate images, and pick from that list.
Look at the Node Description Panel for the Blend Images node, and see that it expects the two images, one for foreground and one for background.
Drag a cable from one Fetch Image node’s output to the Foreground input port and the other to the Background input port.
Confirm by looking at the port popover for Blend Images’s output port (by left-clicking on the output port) to see that its type is Image.
Search the Node Library for “display image,” or, if you remember the quick start example, search for “window” or “render.” Drag the Render Image to Window onto the canvas.
Start dragging a cable from Blend Images’s output port and drop the cable onto the Image port of the Render Image to Window node.
Run the composition — nothing shows up on screen. Why?
At this point you could check the port popover for the Blend Images’s output port. It says “Last event: (none observed).” That is the same message when tracing back to the Fetch Image input ports.
Think about what trigger ports you can use to fire an event. Fire on Start fires once when the composition starts, which should be good for loading images. Connect up the Fire on Start node’s Started port to the refresh port (top left triangle) on the Fetch Image nodes.
Stop the composition and run it again. Now the images show up, blended.
Yet, if you change Foreground Opacity, the change doesn’t affect the composition. You can either check the port popovers again to see that the most recent event was before you changed the port value, or you could remember that Vuo needs events to carry changes downstream.
Look again at trigger ports available in composition and the corresponding node descriptions. The Requested Frame output port of Render Image to Window fires around 60 times per second (or whatever your display refresh rate is set to), so it will update the blended image in real time as you experiment with opacities and blending modes.
Drag a cable from the Requested Frame output port to Blend Images’s (highlighted) refresh port.
Use the input editors on Foreground Opacity and Blend Mode to control the blending.
Now you have a blended image.
Open the Editor’s example compositions, and see that your composition looks likes the example, Blend Images, under vuo.image.
7.1.2. Modifying an existing composition
Again, let’s start with a problem you want to solve, say to display a rotating cube.
You have read from the example composition section that each node set has several example compositions. You know from experience that vuo.scene likely covers 3D objects and scenes.
The example composition, Spin Sphere, sounds pretty close to what you want to do, so open that.
Run the example and see that it spins a sphere.
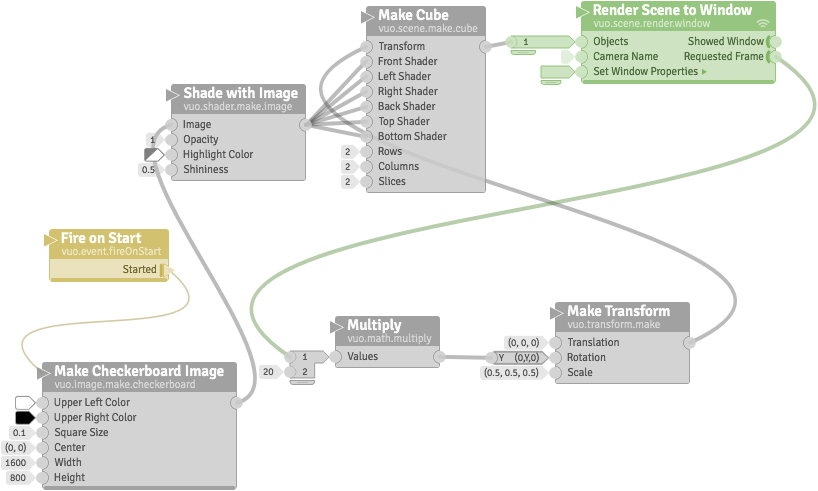
Search for “cube” in the node library and find Make Cube. Add it to the scene.
Now as you inspect the example composition you see that it has a Make 3D Object. This might be where to insert the Make Cube node. But, Make 3D object has three cables going into it. You don’t think you’ll need Make Sphere Mesh, but what about the Shade with Image?
Start by replacing the Make 3D Object node with the Make Cube node and connect it up to the Render Scene to Window node. Leave the Shade with Image node not connected. You see that there is a Transform input port on the Make Cube, like there was on the Make 3D Object. Connect up the output port of the Make Transform node to the Transform port.
Run the composition.
Now you see a large rotating cube, but it doesn’t have any color on its sides, just a ghostly checkerboard. Let’s connect up the Shade with Image to all sides of the cube, and run the composition again.
Now the cube has a black and white checkerboard on all sides, but you’d like it to be smaller. Adjust the Scale on the Make Transform node to 0.5, 0.5, 0.5.
… and now you have a rotating cube.