7.2. Common patterns - “How do I…”
If you’re trying to figure out how to accomplish something in Vuo,
one good starting point is the Node Library search bar. For
example, if you want to make a random list of things, search the
Node Library for “random” to find relevant nodes like
Make Random List and
Shuffle List. Another good
starting point is the example compositions for each node set,
found under
.
Some problems you might want to solve with Vuo aren’t specific to
one node or node set. Certain patterns come up again and again,
whether you’re making compositions to display graphics, play
audio, or anything else. This section covers these general
patterns. Reviewing these patterns can help you create
compositions more quickly and easily.
7.2.2. Do something after something else is done
This is often quite easy, too, because of Vuo’s
rules for event flow.
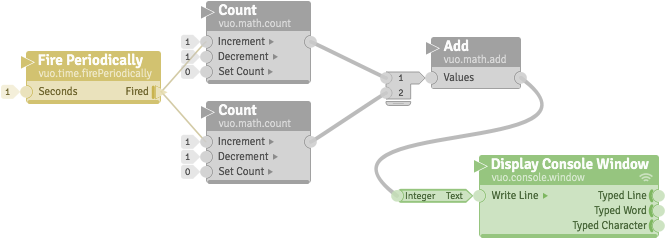
If you want one node to execute before another, you can just
draw a cable from the first node to the second node. In the
composition below, for each event from
Fire Periodically, the two
Count nodes always finish
executing before the Add node
begins executing.
Sometimes you might need to enforce a “do something after
something else is done” rule that’s more complicated than
putting nodes in a sequence, as above. For example, you might
want a composition to do something only after the user has typed
a certain word. The next section explains how to check for
conditions like that and do something when they’re fulfilled.
7.2.3. Do something if one or more conditions are met
Vuo has a data type that represents whether a condition is met:
the Boolean data type. If a node has a Boolean port, that port’s
value can be one of two things: true or
false. True means
“yes, the condition is met”.
False means “no, the condition is not
met”.
When checking if conditions are met, you’ll often be working
with nodes that have a Boolean output port. Many such nodes have
a title that starts with “Is” or
“Are”, like
Is Greater than and
Are Equal.
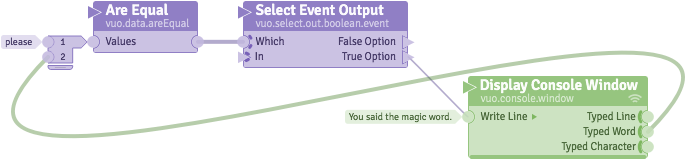
Here’s an example that writes a message on the console window
when the user types the word “please”.
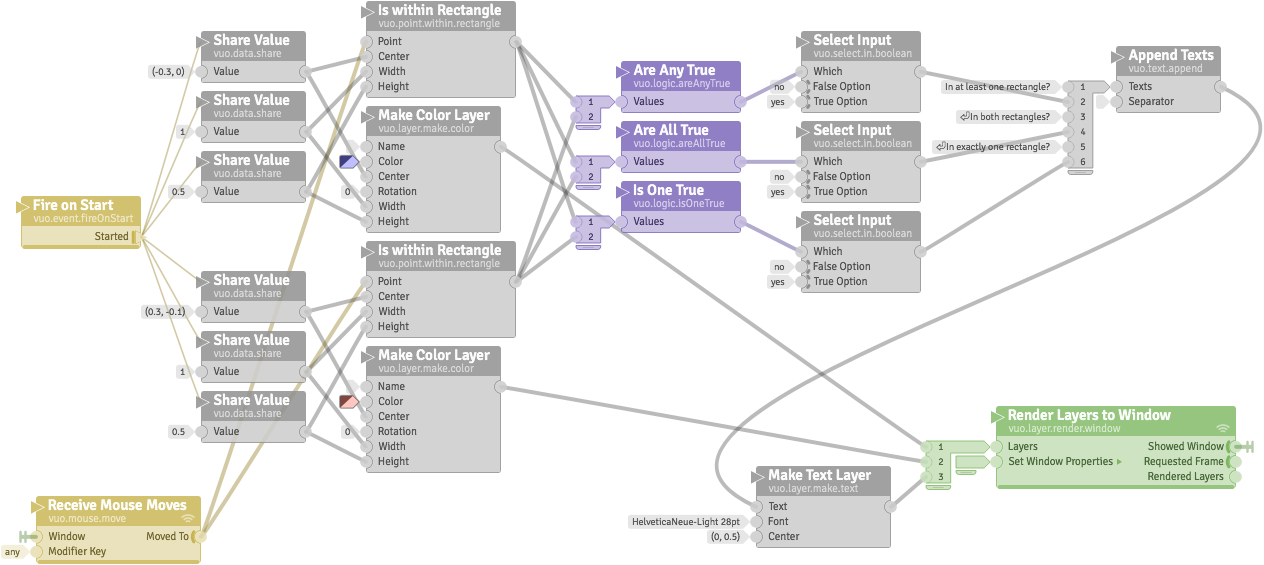
Below is an example
()
that checks two conditions: is the mouse cursor within the blue
rectangle? is it within the red rectangle? The
Are Any True node says yes
(true) if the mouse is within at least one
of the rectangles. The
Are All True node says yes if
the mouse is within both rectangles. The
Is One True node says yes if
the mouse is within one rectangle and not the other.
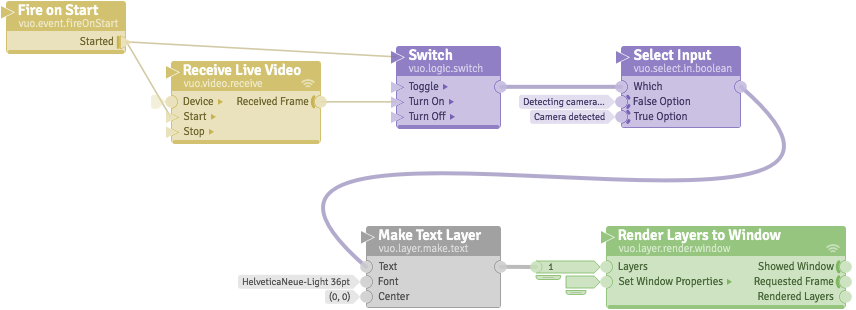
Here’s one more example. It demonstrates how conditions can be
used to coordinate between nodes downstream of different
triggers. The composition displays the message “Camera
detected” once it starts receiving input from the user’s
video camera, that is, once the
Receive Live Video node’s
trigger port starts firing events. The events from that trigger
port change the Switch node’s
output to true, indicating to the rest of
the composition that “Camera detected” should be
displayed.
7.2.4. Do something if an event is blocked
Nodes that have an event door on an input port can let some
events through and block others. If you want to do something
different depending on whether the event was let through or
blocked, you can use an
Are All Hit node.
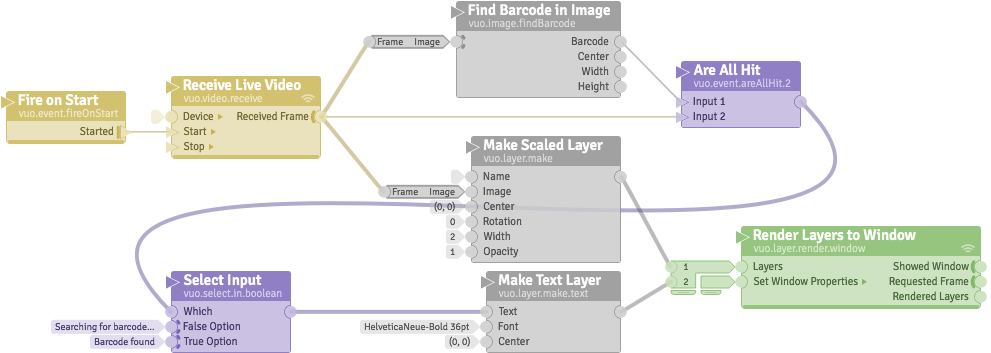
Below is an example that checks if a barcode was found in an
image. Since the
Find Barcode in Image node
blocks events when no barcode is found, the
Are All Hit node is used to
check whether the event was blocked.
Are All Hit outputs
false if
Find Barcode in Image blocks
the event and true otherwise.
7.2.5. Do something if data has changed
Several nodes check if data has changed in a certain way and
only let an event through if it has:
Changed,
Increased,
Decreased,
Became True, and
Became False. In the
composition below, the
Became True node outputs an
event each time the output of
Is Within Rectangle changes
from false to true,
emitting a sound effect each time the mouse cursor enters the
square.
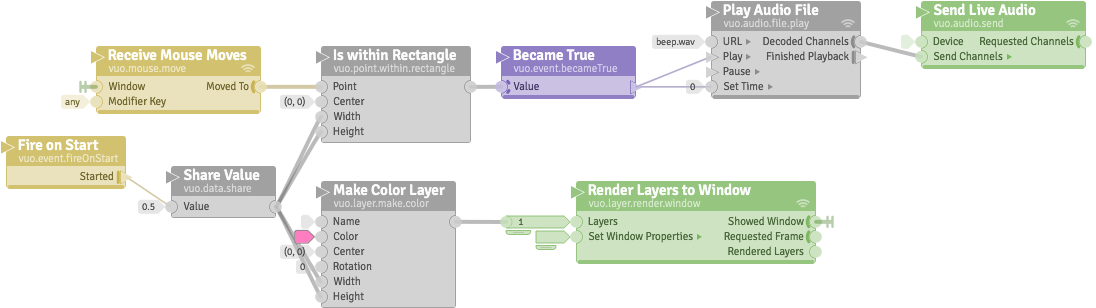
Like Became False and the other
nodes just described, the
Allow Changes node only lets an
event through if the data has changed. But
Allow Changes is different
because it passes the data through along with the event. This
can be useful when your composition does something
time-consuming or processor-intensive with the data, and only
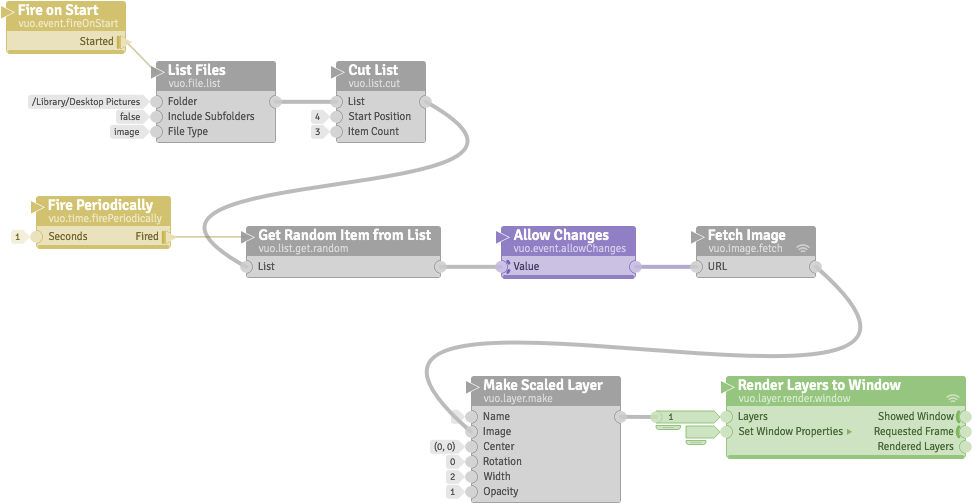
needs to do that work when the data changes. For example, this
composition periodically picks a large image file to load, but
avoids reloading the same image file if it’s picked twice in a
row.
7.2.6. Do something after an amount of time has elapsed
Sometimes, you may want a composition to do something
immediately in response to an event. Other times, you may want
it to wait until a certain amount of time has passed to do
something — for example, launch an animation, start a video, or
display a message.
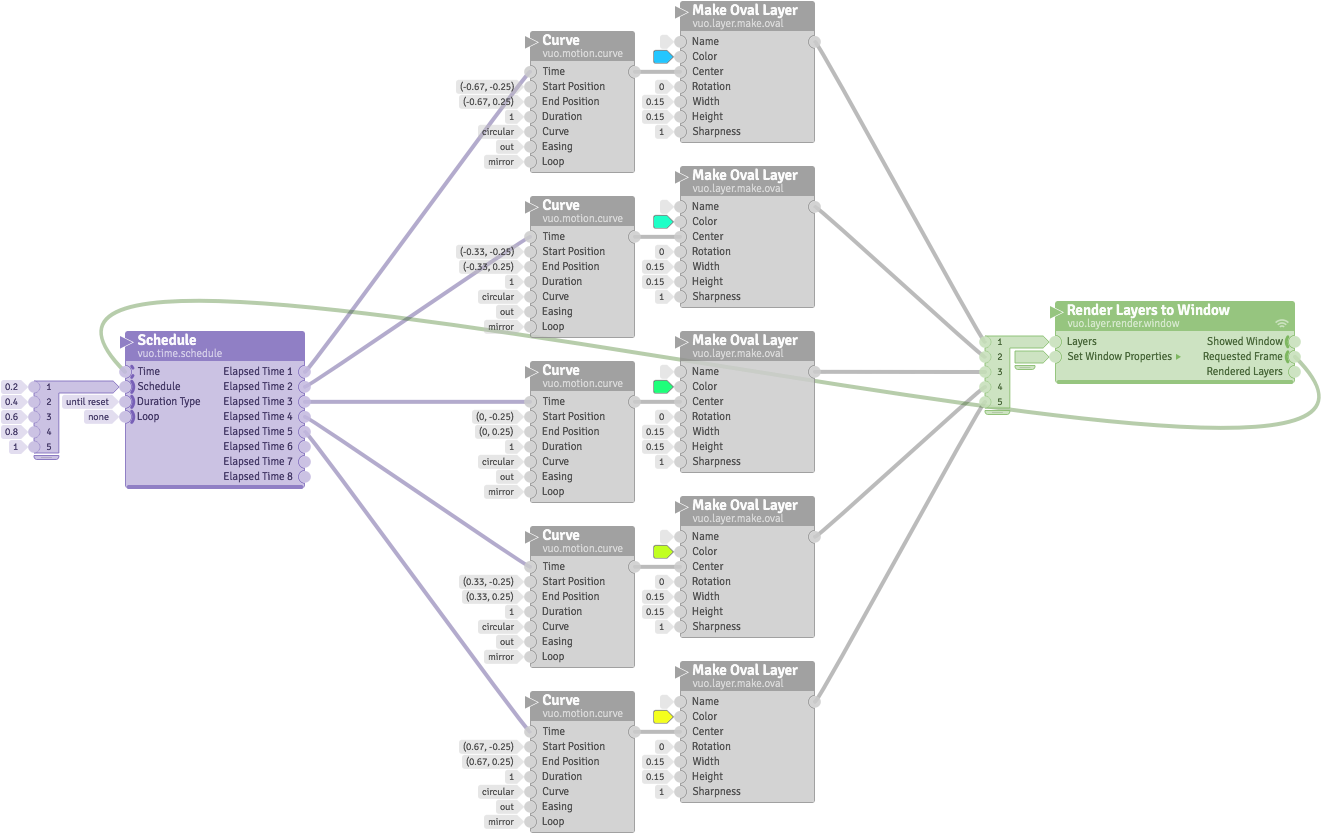
This composition
()
launches a series of animations. At 0.2, 0.4, 0.6, 0.8, and 1
second after the composition starts, it sets in motion the next
in a series of circles. The bouncing movements of the circles
are staggered because each
Elapsed Time port of the
Schedule node outputs a time
that’s 0.2 seconds after the previous
Elapsed Time port’s value.
Instead of scheduling things relative to the start of the
composition, the composition below
()
schedules things relative to the most recent mouse press. When
the mouse is pressed, the rectangle’s color changes to blue,
then gray, then blue, then gray. Why does the
Schedule node in this
composition schedule things relative to the most recent mouse
press, instead of relative to when the composition started, as
in the previous example? Because the
Schedule node’s
Time input port gets its data
from the Measure Time node,
which outputs the time elapsed since the mouse press.

7.2.7. Do something repeatedly over time
If you want a composition to do something every N seconds, there
are several nodes that fire events at a steady rate. The
Requested Frame trigger port on
nodes such as
Render Scene to Window and
Render Layers to Window fires
every time the computer display refreshes, which is usually
about 60 times per second. For a faster or slower rate, you can
use the Fire Periodically node.
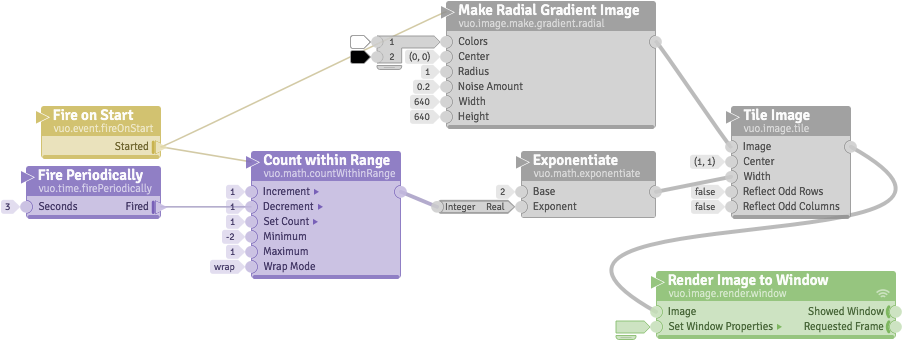
The composition below uses a
Fire Periodically node to
change the width and number of tiled copies of an image every 3
seconds. This composition actually has two kinds of repetition
over time. One is the change in tile width that occurs every 3
seconds because of the
Fire Periodically node. The
other is that the tile width repeats itself every 12 seconds. It
goes from 2, to 1, to 0.5, to 0.25, and then back to 2. This
wrapping-around of the tile width is done by the
Count within Range node.
Count within Range is one of
many ways to cycle through a series of numbers. Another is the
Curve node when its
Loop port is set to
Loop or Mirror. And
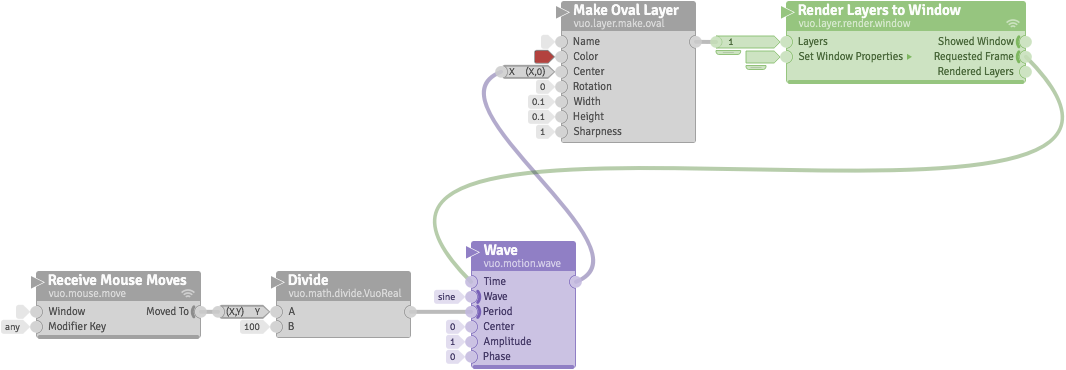
another is the Wave node. The
composition below
()
uses the Wave node to make a
circle move back and forth.
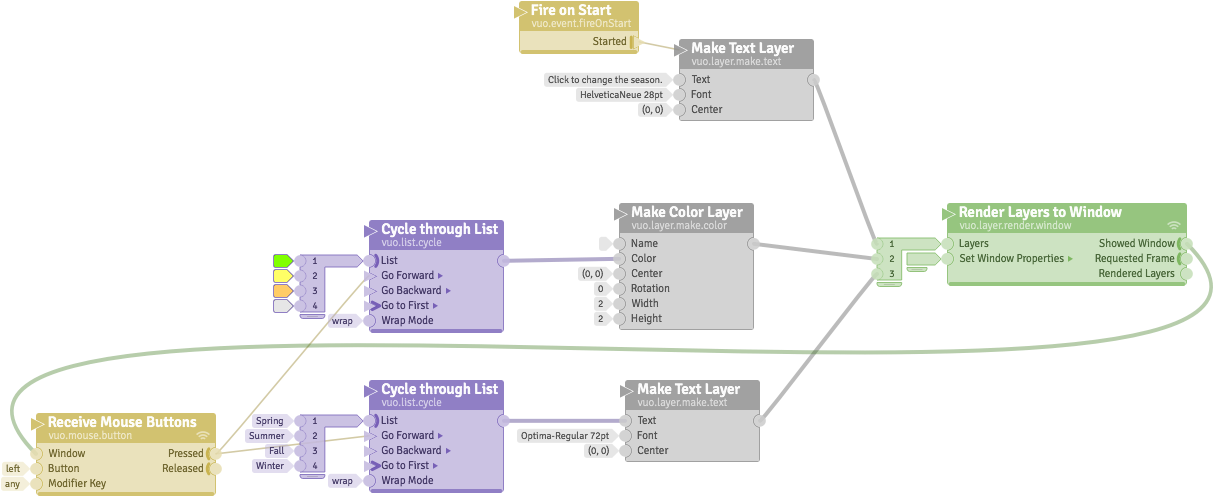
If you want to cycle through a series of things other than
numbers, you can use
Cycle through List. Here’s an
example
()
that uses Cycle through List
nodes to cycle through colors and texts, displaying the next one
each time the mouse is pressed.
7.2.8. Do something to each item in a list
Where you would use an Iterator patch in Quartz Composer, you might use a Process List or Build List node in Vuo.
Process List and Build List are Vuo's general-purpose nodes for iteration. They're similar to text programming constructs such as loop control structures and foreach and apply functions.
The previous section showed how to do something with each list
item in turn, using a
Cycle through List node. For
each event the
Cycle through List node
receives, it outputs one list item. If instead you want an event
to do something to all list items, you can use the
Process List node.
Here’s an example
()
that turns a list of images into a list of layers using
Process List. When
Process List gets an event and
list of images into its Fire
port, it rapidly fires a series of events through its
Process Item port, one event
for each image in the list. The image and event go through the
Make Scaled Layer node, and the
created layer and event go into the
Process List node’s
Processed Item port. Once that
port has received as many events as
Process Item fired, the
Processed List port fires an
event with the accumulated list of created layers.

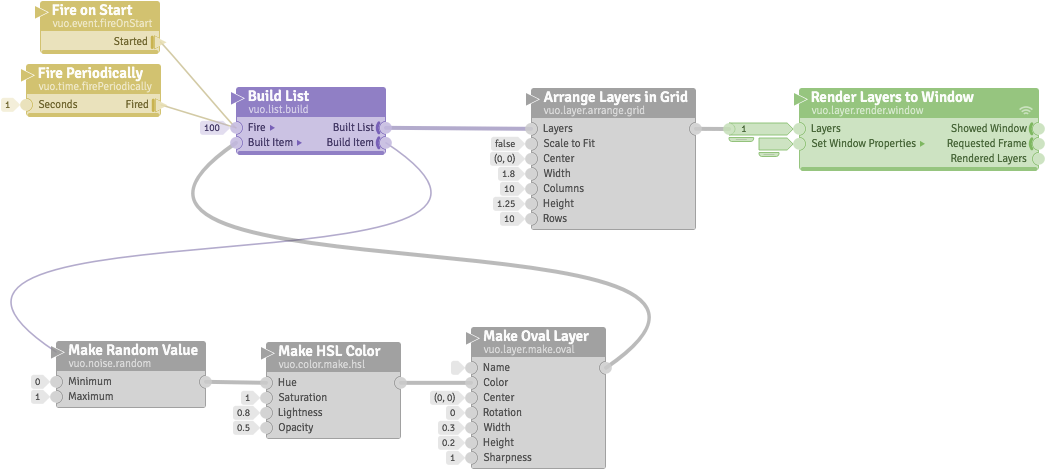
7.2.9. Create a list of things
If you don’t have a list to start with, one way to create one is
with the Build List node.
Build List looks a lot like
Process List. The difference is
that the Build List node’s
Fire port inputs an integer
(the number of list items to create) instead of a list, and the
Build Item port rapidly fires a
series of integers (from 1 to the number of list items) instead
of input list items. Here’s an example
()
that uses the Build List node
to display a grid of 100 different-colored ovals.
Build List and
Process List are
general-purpose tools. Vuo also provides some simpler, more
specialized ways to create certain types of lists. These include
Make Random List to make a list
of random numbers or points,
Copy Layer and
Copy Scene to duplicate a 2D or
3D object, and Enqueue, which
is explained in the next section.
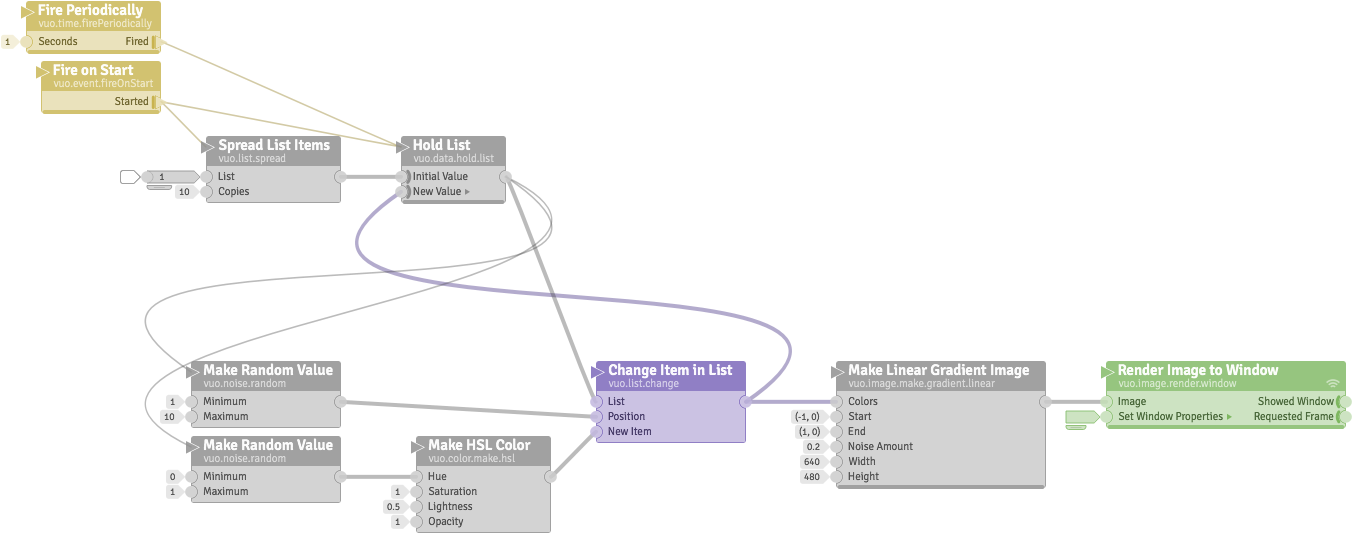
7.2.10. Maintain a list of things
Sometimes you may want not only to create a list, but also to
hold onto it and make changes to it over time. One way to do
that is with a feedback loop, as in the example composition
below
().
It maintains a list of colors, randomly changing one of them
every 1 second.
Another way you might want to maintain a list is to accumulate a
queue of items over time, using the
Enqueue node. A queue in this
node is like a queue of people waiting in line. It’s
first-in-first-out, meaning that new items get added to the end
of the line, and the item that’s been waiting in line the
longest is the next one that can leave the queue. Here’s an
example that uses Enqueue to
remember the positions of the 5 most recent mouse presses.

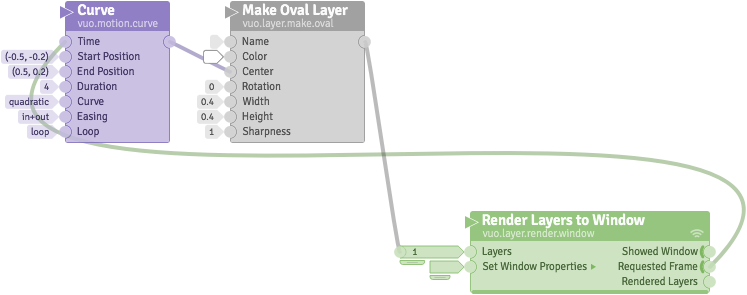
7.2.11. Gradually change from one number/point to another
Earlier, under “Do something repeatedly over time”,
the Curve and
Wave nodes were mentioned as
ways to cycle through a series of numbers or points. You can
also think of these nodes as ways to gradually change from one
number or point to another. Here’s an example that uses a
Curve node to gradually move a
circle from one point to another. Since the
Curve port is set to
Quadratic and the
Easing port is set to
In + Out, the circle starts moving slowly,
picks up speed, and then slows down as it reaches its
destination.
Another way to gradually change from one number or point to
another is with the “Smooth” nodes —
Smooth with Duration,
Smooth with Inertia,
Smooth with Rate, and
Smooth with Spring. Here’s an
example
()
that makes a square spring back to the center of the window when
the user drags and releases it.

7.2.12. Set up a port’s data when the composition starts
When a composition starts running, its data-and-event input
ports start out with some initial data — either the port’s
constant value, if you’ve used the input editor to set one for
the port, or the port’s default value. An input port with an
incoming data-and-event cable stays at its default value until
the first data-and-event comes in through the cable. Sometimes
you may want to send certain data with that first event so that
the port will start off with the right value.
A simple way to do that is with a
Fire on Start node. In the
Smooth with Spring example in
the previous section, the
Fire on Start node fires an
event that sets up the data for two input ports. One is the
Align Layer to Window node’s
Layer input port, which gets
the layer created by
Make Text Layer. The other is
the Smooth with Spring node’s
Set Position input port, which
gets initialized to (0,0). The
Select Latest node helps out
here by sending (0,0) to the
Set Position port for the
Fire on Start event and, after
that, the current mouse position each time the
Receive Mouse Drags on Layer
fires an event.
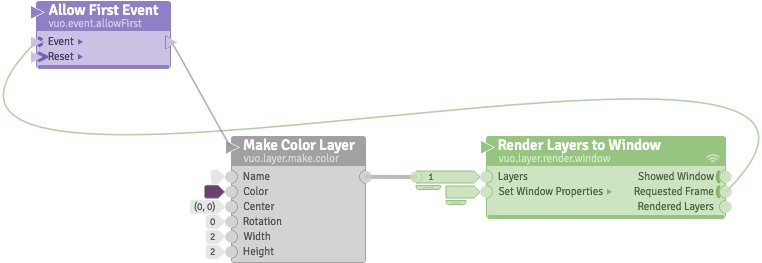
Using Fire on Start to set up
data is pretty simple, but it has one weakness: the
Fire on Start node’s trigger
isn’t coordinated with other triggers in the composition. If
you’re trying to use
Fire on Start together with the
Requested Frame port of
Render Layers to Window or
Render Scene to Window, you
might see a momentary flicker or adjustment in graphics as the
composition starts. That’s because the
Fire on Start event and the
first Requested Frame event are
setting up different parts of the graphics at slightly different
times. So how can you avoid the flicker? Instead of
Fire on Start, which fires its
own event, use
Allow First Event, which can
borrow the event fired from
Requested Frame. Here’s an
example.
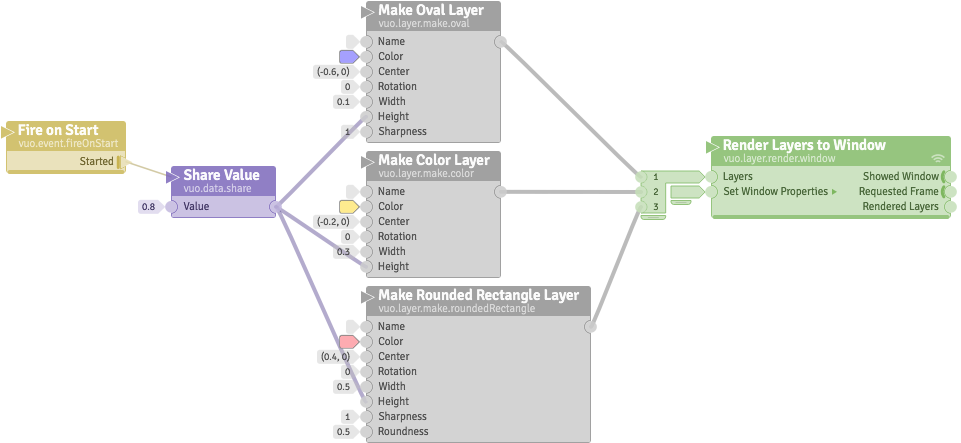
7.2.14. Strip out data, leaving just an event
In the previous section’s example, you could think of the
Share Value node as adding data
to an event — an event goes into the node, and an event plus
data comes out. What if you want to do the opposite — start with
an event plus data, and end up with just an event? You don’t
need a node to do this. Instead, hold down
⌥ (Option) while dragging a data-and-event
cable to change it to an event-only cable.
7.2.15. Merge data/events from multiple triggers
When you have streams of events from multiple triggers flowing
through your composition, usually those streams of events have
to merge somewhere in the composition.
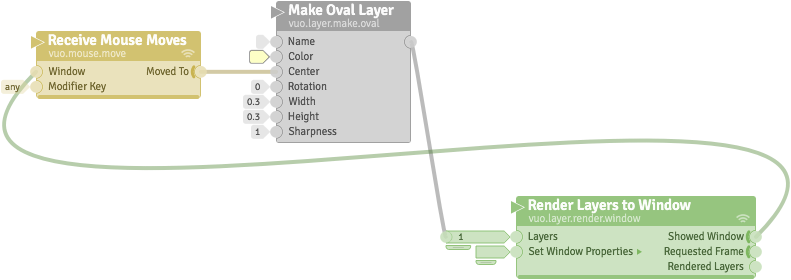
Sometimes the streams of events just naturally overlap, as in
the example below
().
The events fired from the
Requested Frame port on
Render Scene to Window and the
events fired from the Moved To
port on Receive Mouse Moves
both travel through the
Make Transform and
Make Sphere nodes to the
Render Scene to Window Node.

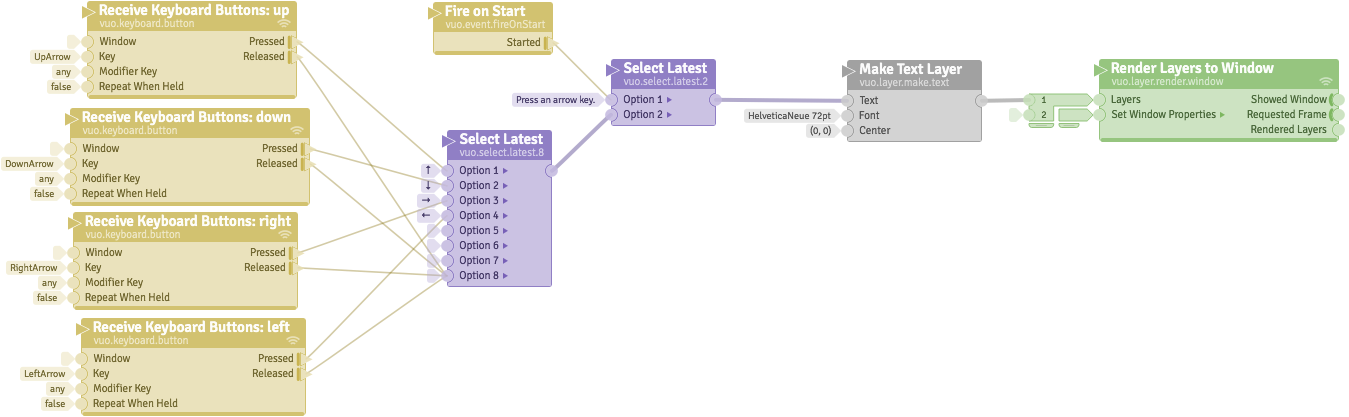
Other times, you may want to merge the event streams more
intentionally. Here’s an example
()
that takes input from key presses on different arrow keys, and
displays a message for each one. The
Select Latest node lets the
events from each arrow key through.
Here’s an example that shows a different way of merging two
event streams. This composition
()
draws two gradients that each follow the mouse cursor a bit
differently. The purple (upper) gradient stays with the mouse
all the time. The violet (lower) gradient only updates every 1
second. For the lower gradient, the event streams from
Receive Mouse Moves and
Fire Periodically merge at the
Hold Value node. Unlike the
composition in the previous example, which let both event
streams through, this composition lets one event stream through
and blocks the other. However, the data left by the blocked
event stream (from
Receive Mouse Moves) gets
picked up and carried along downstream by the other event stream
(from Fire Periodically).

7.2.16. Route data/events through the composition
Vuo's Select Input node is similar to Quartz Composer's Multiplexer patch. Vuo's Select Output node is similar to Quartz Composer's Demultiplexer patch.
Vuo's Select Input and Select Output are similar to if/else or switch/case statements.
In the last example in the previous section, events from the
Receive Mouse Moves node’s
trigger were always blocked at the
Hold Value node, and events
from the Fire Periodically
node’s trigger were always allowed through. Instead of always
blocking one trigger’s events and always letting another
trigger’s events through, what if you want to switch between the
event streams?
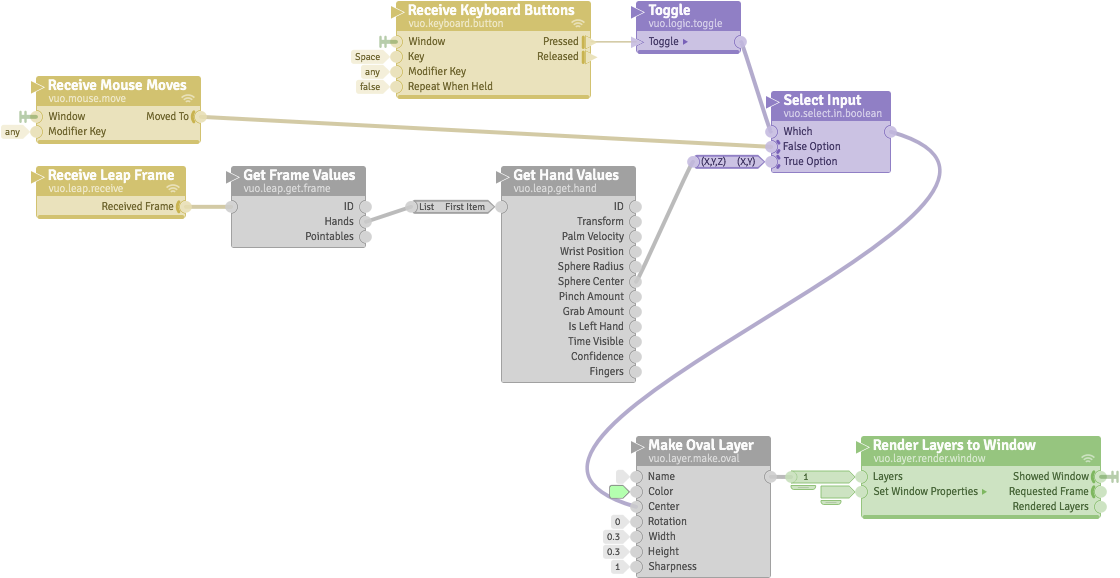
Here’s an example with a keyboard control that switches the
data-and-event stream that controls a circle’s position. When
the user presses the space bar, setting the
Select Input node’s
Which port to
true, the circle is controlled by the Leap
Motion device. When the user presses the space bar again,
setting the Which port to
false, the circle is controlled by the
mouse. Whichever data-and-event stream is
not controlling the circle at a given time
is blocked at the Select Input
node.
Instead of taking multiple event streams and picking one to let
through, as in the previous example, what if you have a single
event stream and want to pick one of several downstream paths to
route it to? Below is an example of that. The space bar toggles
between two circles. Whichever circle is chosen at a given time
is controlled by the mouse. This works because the
Select Output node routes the
data-and-event stream from
Receive Mouse Moves through
just one of its output ports at a time.

7.2.17. Run slow parts of the composition in the background
Different parts of the composition can be executing
simultaneously. If you have multiple triggers firing events
through the composition, events from both triggers can be
traveling through the composition at the same time. This fact
comes in handy if you want a composition to start working on a
slow task and do something quicker in the meantime.
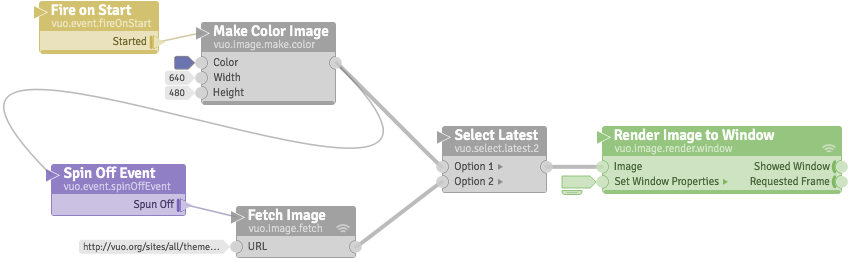
Here’s an example
().
The slow task, in this case, is to download an image from the
internet. Immediately after this composition starts running, it
starts downloading the image and, in the meantime, fills the
window with a solid color. The
Spin Off Event node is what
allows the download to happen in the background. If
Spin Off Event weren’t there,
then the Select Latest node
would wait for both
Make Color Image and
Fetch Image to complete before
it executed. But, thanks to
Spin Off Event, the
Fetch Image node is now
executed by a different event than the
Make Color Image node, so
Select Latest can go ahead and
execute as soon as
Make Color Image is complete.